반응형

이번 2학기 개발에서는 기존 카카오 로그인에 추가로 네이버 로그인과 구글 로그인을 추가하게 되었다.


카카오 로그인과 구글 로그인도 글을 작성하겠지만, 우선 네이버 로그인부터 작성을 해보려고 한다.


각각의 Oauth에서는 사용할 기능이 토큰 받아오기, 사용자 정보 받아오기 이렇게 2가지이기 때문에 인터페이스를 만들고 해당 인터페이스를 구현하는 방법으로 각각의 Oauth 로그인을 만들었다.


우선 작성한 인터페이스이다.

interface OauthService {

    fun getOauth(code: String, isRemote: Boolean): Oauth
    fun getAccessToken(code: String, isRemote: Boolean): String
}


redirect_uri를 원격서버, 로컬서버 이렇게 2개 연결하고 싶었기 때문에 그것을 결정하기 위한 isRemote 파라미터를 추가하였다.

그리고 Oauth에서 정보를 받아와 사용자의 정보를 구별하기 위한 Oauth data class를 사용하였다.


사용한 Oauth data class는 다음과 같다.

@Entity
@Table(
    indexes = [
        Index(name = "idx_type_id", columnList = "oauthType, oauthId")
    ]
)
data class Oauth(
    @Id
    @GeneratedValue(strategy = GenerationType.IDENTITY)
    var id: Int?,
    @ManyToOne
    var user: User?,
    @Column(length = 100)
    var oauthId: String,
    @Enumerated(EnumType.ORDINAL)
    var oauthType: OauthTypeEnum
)


그러면 이제 네이버 Oauth를 통해서 oauthId를 받아오도록 해보자.


우선 여기에서 애플리케이션을 등록해야 한다.

https://developers.naver.com/main/


NAVER Developers

네이버 오픈 API들을 활용해 개발자들이 다양한 애플리케이션을 개발할 수 있도록 API 가이드와 SDK를 제공합니다. 제공중인 오픈 API에는 네이버 로그인, 검색, 단축URL, 캡차를 비롯 기계번역, 음

developers.naver.com


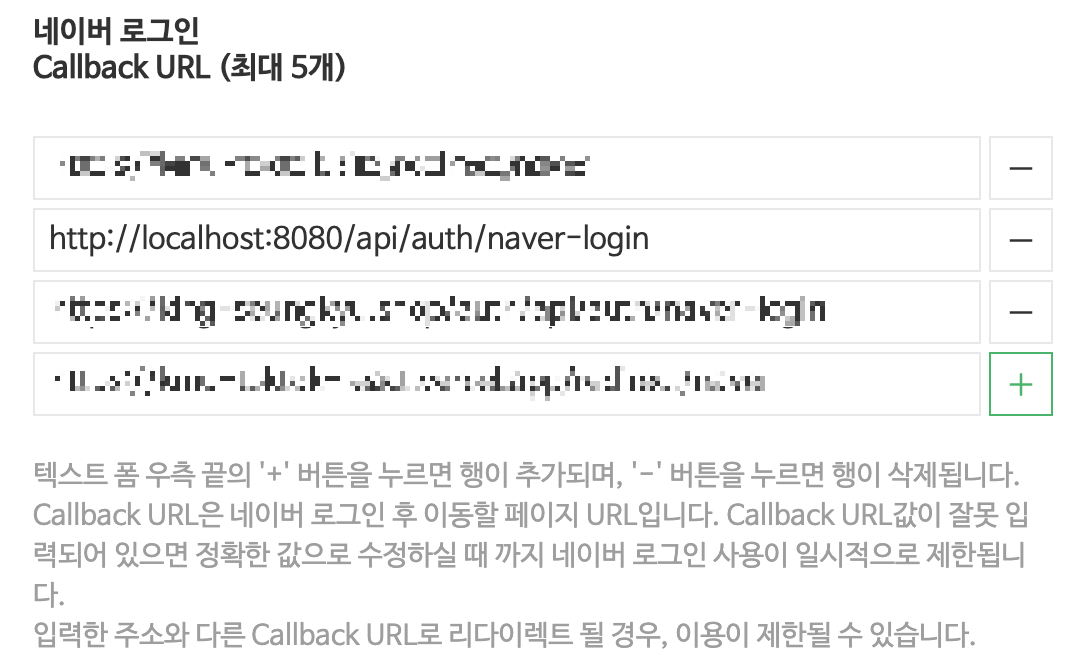
그리고 토큰을 받아올 수 있도록 redirect_uri를 지정해준다.

우선 로컬에서 사용하기 때문에, http://localhost:8080/api/auth/naver-login으로 만들어줬다.


이 주소는 나중에 서비스가 배포된다면 변경해주거나 추가해주어야 한다.


우선 Controller이다.

    @GetMapping("/naver-login")
    @Operation(summary = "네이버 로그인 API")
    @Parameters(
        Parameter(name = "code", description = "네이버 로그인 code")
    )
    fun getNaverLogin(
        @RequestParam code: String
    ): ResponseEntity<CoBoResponseDto<GetAuthLoginRes>>{
        return authService.getNaverLogin(code)
    }

이렇게 그냥 Parameter로 코드만 가져오면 된다.


  • AccessToken 받아오기
        private final val naverAccessTokenServer = "https://nid.naver.com/oauth2.0/token"

	override fun getAccessToken(code: String, isRemote: Boolean): String {
        val restTemplate = RestTemplate()

        val httpHeaders = HttpHeaders()

        httpHeaders.add("Content-Type", "application/x-www-form-urlencoded;charset=utf-8")

        val httpBody = LinkedMultiValueMap<String, String>()

        httpBody.add("client_id", clientId)
        httpBody.add("client_secret", clientSecret)
        httpBody.add("code", code)

        return restTemplate.postForObject(naverAccessTokenServer, this.getHttpEntity(httpBody), NaverAccessToken::class.java)?.accessToken ?: ""
    }
    
    fun getHttpEntity(httpBody: LinkedMultiValueMap<String, String>): HttpEntity<LinkedMultiValueMap<String, String>> {
        val httpHeaders = HttpHeaders()
        httpHeaders.add("Content-Type", "application/x-www-form-urlencoded;charset=utf-8")

        httpBody.add("grant_type", "authorization_code")

        return HttpEntity(httpBody, httpHeaders)
    }
    
        private data class NaverAccessToken(
        @JsonProperty("access_token") val accessToken: String,
        @JsonProperty("state") val state: String?,
        @JsonProperty("error") val error: String?,
        @JsonProperty("error_description") val errorDescription: String?
    )


RestTemplate를 통해 작성했다.


https://nid.naver.com/oauth2.0/token

해당 주소로 POST를 사용해 

client_id, client_secret, code를 넣어서 요청하면 된다.

응답받는 json은 아래와 같다.

당연히 client_id, client_secret은 환경변수에 넣어두고 가져오면 된다.


이렇게 해당 사용자의 AccessToken을 받아오게 되었다.


  • 사용자 정보 가져오기

이제 사용자의 고유 Id를 가져오자.


응답받은 AccessToken을 그대로 넣어서 요청하면 끝난다.

https://developers.naver.com/docs/login/profile/profile.md


네이버 회원 프로필 조회 API 명세 - LOGIN

네이버 회원 프로필 조회 API 명세 NAVER Developers - 네이버 로그인 회원 프로필 조회 가이드 네이버 로그인을 통해 인증받은 받고 정보 제공에 동의한 회원에 대해 회원 메일 주소, 별명, 프로필 사

developers.naver.com


    private final val naverUserInfoServer = "https://openapi.naver.com/v1/nid/me"

    override fun getOauth(code: String, isRemote: Boolean): Oauth {

        val accessToken = getAccessToken(code, isRemote)

        val restTemplate = RestTemplate()

        val naverUserInfo = restTemplate.exchange(
            RequestEntity<Any>(this.getHttpHeadersWithAuthorization(accessToken), HttpMethod.GET, URI.create(naverUserInfoServer)),
            NaverUserInfo::class.java
        ).body

        val naverUserId = naverUserInfo?.response?.id ?: ""

        return this.getOauthFromOauthIdAndOauthType(
            oauthId = naverUserId,
            oauthTypeEnum = OauthTypeEnum.NAVER,
            accessToken = accessToken)
    }

    fun getHttpHeadersWithAuthorization(accessToken: String): HttpHeaders{
        val httpHeaders = HttpHeaders()
        httpHeaders.add("Content-Type", "application/x-www-form-urlencoded;charset=utf-8")
        httpHeaders.add("Authorization", "Bearer $accessToken")

        return httpHeaders
    }

    private data class NaverUserInfo(
        @JsonProperty("resultcode") val resultCode: String,
        @JsonProperty("message") val message: String,
        @JsonProperty("response") val response: Response,
    )

    private data class Response(
        @JsonProperty("id") val id: String,
        @JsonProperty("nickname") val nickname: String?,
        @JsonProperty("name") val name: String?,
        @JsonProperty("email") val email: String?,
        @JsonProperty("gender") val gender: String?,
        @JsonProperty("age") val age: String?,
        @JsonProperty("birthday") val birthday: String?,
        @JsonProperty("profile_image") val profileImage: String?,
        @JsonProperty("birthyear") val birthyear: String?,
        @JsonProperty("mobile") val mobile: String?
    )


하지만 이번은 Post가 아니라 Get이기 때문에 다른 방법을 사용한다.

저렇게 헤더에 Bearer로 토큰만 넣어주면 응답값이 나온다.

응답의 결과는 아래의 data class와 같지만, 어차피 id만 사용하기 때문에 id만 가져오도록 만들었다.


이렇게해서 네이버 로그인으로 로그인한 사용자를 고유번호를 통해 식별할 수 있게 되었다.


아래는 사용한 전체 코드이다.

package cobo.auth.service.oauth.impl

import cobo.auth.data.entity.Oauth
import cobo.auth.data.enums.OauthTypeEnum
import cobo.auth.repository.OauthRepository
import cobo.auth.service.oauth.OauthService
import com.fasterxml.jackson.annotation.JsonProperty
import org.springframework.beans.factory.annotation.Value
import org.springframework.http.HttpHeaders
import org.springframework.http.HttpMethod
import org.springframework.http.RequestEntity
import org.springframework.stereotype.Service
import org.springframework.util.LinkedMultiValueMap
import org.springframework.web.client.RestTemplate
import java.net.URI

@Service
class NaverOauthServiceImpl(
    @Value("\${naver.auth.client_id}")
    private val clientId: String,
    @Value("\${naver.auth.client_secret}")
    private val clientSecret: String,
    private val oauthRepository: OauthRepository
): OauthService, OauthServiceImpl(oauthRepository) {

    private final val naverAccessTokenServer = "https://nid.naver.com/oauth2.0/token"
    private final val naverUserInfoServer = "https://openapi.naver.com/v1/nid/me"

    override fun getOauth(code: String, isRemote: Boolean): Oauth {

        val accessToken = getAccessToken(code, isRemote)

        val restTemplate = RestTemplate()

        val naverUserInfo = restTemplate.exchange(
            RequestEntity<Any>(this.getHttpHeadersWithAuthorization(accessToken), HttpMethod.GET, URI.create(naverUserInfoServer)),
            NaverUserInfo::class.java
        ).body

        val naverUserId = naverUserInfo?.response?.id ?: ""

        return this.getOauthFromOauthIdAndOauthType(
            oauthId = naverUserId,
            oauthTypeEnum = OauthTypeEnum.NAVER,
            accessToken = accessToken)
    }

    override fun getAccessToken(code: String, isRemote: Boolean): String {
        val restTemplate = RestTemplate()

        val httpHeaders = HttpHeaders()

        httpHeaders.add("Content-Type", "application/x-www-form-urlencoded;charset=utf-8")

        val httpBody = LinkedMultiValueMap<String, String>()

        httpBody.add("client_id", clientId)
        httpBody.add("client_secret", clientSecret)
        httpBody.add("code", code)

        return restTemplate.postForObject(naverAccessTokenServer, this.getHttpEntity(httpBody), NaverAccessToken::class.java)?.accessToken ?: ""
    }

    private data class NaverAccessToken(
        @JsonProperty("access_token") val accessToken: String,
        @JsonProperty("state") val state: String?,
        @JsonProperty("error") val error: String?,
        @JsonProperty("error_description") val errorDescription: String?
    )

    private data class NaverUserInfo(
        @JsonProperty("resultcode") val resultCode: String,
        @JsonProperty("message") val message: String,
        @JsonProperty("response") val response: Response,
    )

    private data class Response(
        @JsonProperty("id") val id: String,
        @JsonProperty("nickname") val nickname: String?,
        @JsonProperty("name") val name: String?,
        @JsonProperty("email") val email: String?,
        @JsonProperty("gender") val gender: String?,
        @JsonProperty("age") val age: String?,
        @JsonProperty("birthday") val birthday: String?,
        @JsonProperty("profile_image") val profileImage: String?,
        @JsonProperty("birthyear") val birthyear: String?,
        @JsonProperty("mobile") val mobile: String?
    )
}


package cobo.auth.service.oauth.impl

import cobo.auth.data.entity.Oauth
import cobo.auth.data.enums.OauthTypeEnum
import cobo.auth.repository.OauthRepository
import org.springframework.http.HttpEntity
import org.springframework.http.HttpHeaders
import org.springframework.util.LinkedMultiValueMap
import java.util.concurrent.CompletableFuture

open class OauthServiceImpl(
    private val oauthRepository: OauthRepository
) {

    fun getHttpEntity(httpBody: LinkedMultiValueMap<String, String>): HttpEntity<LinkedMultiValueMap<String, String>> {
        val httpHeaders = HttpHeaders()
        httpHeaders.add("Content-Type", "application/x-www-form-urlencoded;charset=utf-8")

        httpBody.add("grant_type", "authorization_code")

        return HttpEntity(httpBody, httpHeaders)
    }

    fun getHttpHeadersWithAuthorization(accessToken: String): HttpHeaders{
        val httpHeaders = HttpHeaders()
        httpHeaders.add("Content-Type", "application/x-www-form-urlencoded;charset=utf-8")
        httpHeaders.add("Authorization", "Bearer $accessToken")

        return httpHeaders
    }

    fun getOauthFromOauthIdAndOauthType(oauthId: String, oauthTypeEnum: OauthTypeEnum, accessToken: String): Oauth {
        val optionalOauth = oauthRepository.findByOauthIdAndOauthType(oauthId, oauthTypeEnum)

        if (optionalOauth.isPresent) {
            CompletableFuture.supplyAsync{
                optionalOauth.get()
            }.thenApply {
                oauthRepository.save(it)
            }
            return optionalOauth.get()
        }
        else{
            return oauthRepository.save(Oauth(
                id = null,
                user = null,
                oauthId = oauthId,
                oauthType = oauthTypeEnum
            ))
        }
    }
}
반응형

이번 프로젝트에도 역시 MSA를 사용하게 되었다.

물론 실제 배포 환경에서는 각각의 서버를 각각의 인스턴스에서 동작하겠지만, 개발 환경에서는 굳이 그럴 필요가 없다.

하나의 인스턴스에서 여러개의 로드밸런서로 각각의 도메인을 주는 것도 돈이 많이 나간다.


그렇기 때문에 하나의 도메인에서 nginx를 이용하여 각각의 path에 서로 다른 서버를 실행하려고 한다.

그리고 개발하는 환경이기 때문에 가장 먼저 Swagger를 설정하려고 한다.


  • Nginx

우선 Nginx 설정이다.

가장먼저 auth 서버를 개발했기 때문에


https://도메인/auth/api

이렇게 auth 서버의 url을 부여하려고 한다.


우선 nginx의 설정이다.

/etc/nginx/sites-available 에서 default에 

        location /auth/ {
                proxy_pass http://localhost:8080/;
                proxy_set_header X-Real-IP $remote_addr;
                proxy_set_header X-Forwarded-For $proxy_add_x_forwarded_for;
                proxy_set_header Host $http_host;

                proxy_set_header X-Forwarded-Prefix /auth;
        }


이렇게 location을 추가해주자.


이러면 https://도메인/auth으로 요청했을 때, 해당 서버의 8080포트로 요청이 가게 된다.


이러면 일단 postman을 사용할 때, API는 정상적으로 작동하게 될 것이다.


  • Swagger

하지만 Swagger는 config를 찾을 수 없다며, 화면이 보이지는 않을 것이다.

Swagger가 요청하는 주소도 /auth가 붙도록 설정해주어야 한다.


우선 application.yml 설정이다.

server:
  forward-headers-strategy: framework


이 내용을 추가해주고 

Swagger Config에도

@Bean
fun forwardedHeaderFilter(): ForwardedHeaderFilter {
    return ForwardedHeaderFilter()
}


해당 Bean(Kotlin)을 추가해준다.


이러면 Swagger에서 forwarding을 하기 때문에 Swagger의 페이지는 보이게 된다.


하지만 Swagger가 보인다고 해서, Swagger가 정상적으로 작동하는 것은 아니다.


API Try를 해보면, Nginx 404 Not found가 나오게 될 것이다.


이게 API 요청을

https://도메인/auth/api로 해야 하는데, https://도메인/api로 하기 때문이다.

그렇기 때문에 Swagger의 기본 주소도 변경해주어야 한다.


OpenAPI의 Bean에 해당 Server url을 추가해주도록 하자.


나는 이렇게 환경변수에서 받아오도록 만들었다.

이렇게 해서 Swagger를 실행하면 


이렇게 Swagger 기본 주소가 나오게 될텐데, 이러면 성공한 것이다.


이렇게 설정하면 Nginx로 Swagger를 Proxy_pass하여 사용 할 수 있다.

반응형

팀원이 작성한 코드에서 성능 튜닝이 필요한 코드를 찾았다.

override fun patchAdmin(routineId: Int, newAdminId: Int, authentication: Authentication): ResponseEntity<CoBoResponseDto<CoBoResponseStatus>> {
        val user = userRepository.findById(authentication.name.toInt())
            .orElseThrow{throw NoSuchElementException("일치하는 사용자가 없습니다.")}

        val newAdmin = userRepository.findById(newAdminId)
            .orElseThrow{throw NoSuchElementException("일치하는 사용자가 없습니다.")}

        val routine = routineRepository.findById(routineId)
            .orElseThrow{throw NoSuchElementException("일치하는 루틴이 없습니다.")}

        if (routine.admin != user)
            throw IllegalAccessException("수정 권한이 없습니다.")

        if (!participationRepository.existsByUserAndRoutine(newAdmin, routine))
            throw NoSuchElementException("참여 정보가 없는 사용자입니다.")

        routine.admin = newAdmin
        routineRepository.save(routine)

        return CoBoResponse<CoBoResponseStatus>(CoBoResponseStatus.SUCCESS).getResponseEntity()
    }


해당 코드이다.


무려 데이터베이스에 5번 접근하게 된다.

마지막에 save하는 부분은 데이터베이스에서 데이터를 가져온 후 호출해야 하기 때문에 마지막에 실행해야 하지만, 위의 4개의 접근은 의존성이 존재하지 않기 때문에 4개를 각각 다른 쓰레드에서 비동기적으로 실행이 가능하다.


if (!participationRepository.existsByUserAndRoutine(newAdmin, routine))
            throw NoSuchElementException("참여 정보가 없는 사용자입니다.")


현재 이 코드는 의존성이 존재하지만, JPA가 아닌 QueryDsl을 사용하여 리펙토링해서 의존성을 없애도록 하였다.


participationRepository.existsByUserIdAndRoutineIdByQueryDsl(newAdminId, routineId)


이렇게 Entity가 아닌 Int 타입의 Id로 검색하도록 코드를 변경했다.

override fun existsByUserIdAndRoutineIdByQueryDsl(userId: Int, routineId: Int): Boolean {
        return jpaQueryFactory
            .select(participation)
            .from(participation)
            .leftJoin(participation.user)
            .where(
                participation.routine.id.eq(routineId),
                participation.user.kakaoId.eq(userId)
            ).fetchFirst() != null
    }


이 부분은 QueryDsl의 코드이다.


이렇게 저 코드에서도 비동기적으로 실행 할 수 있도록 의존성을 제거하였다.


이제 application 단계에서 코드들을 비동기적으로 처리하여 속도를 높여보자.

override fun patchAdmin(routineId: Int, newAdminId: Int, authentication: Authentication): ResponseEntity<CoBoResponseDto<CoBoResponseStatus>> {

        val userCompletableFuture = CompletableFuture.supplyAsync{
            userRepository.findById(authentication.name.toInt())
                .orElseThrow{throw NoSuchElementException("일치하는 사용자가 없습니다.")}
        }

        val newAdminFuture = CompletableFuture.supplyAsync {
            userRepository.findById(newAdminId)
                .orElseThrow{throw NoSuchElementException("일치하는 사용자가 없습니다.")}
        }

        val routineFuture = CompletableFuture.supplyAsync{
            routineRepository.findById(routineId)
                .orElseThrow{throw NoSuchElementException("일치하는 루틴이 없습니다.")}
        }

        val isParticipationFuture = CompletableFuture.supplyAsync{
            participationRepository.existsByUserIdAndRoutineIdByQueryDsl(newAdminId, routineId)
        }

        return CompletableFuture.allOf(userCompletableFuture, newAdminFuture, routineFuture, isParticipationFuture)
            .thenApplyAsync {

                val user = userCompletableFuture.get()
                val newAdmin = newAdminFuture.get()
                val routine = routineFuture.get()
                val isParticipation = isParticipationFuture.get()

                if (routine.admin != user)
                    throw IllegalAccessException("수정 권한이 없습니다.")

                if (!isParticipation)
                    throw NoSuchElementException("참여 정보가 없는 사용자입니다.")

                routine.admin = newAdmin
                routineRepository.save(routine)

                CoBoResponse<CoBoResponseStatus>(CoBoResponseStatus.SUCCESS).getResponseEntity()
            }.get()
    }


이렇게 코드를 변경하였다.


위의 4개를 CompletableFuture로 담아 비동기적으로 실행하였으며, 4개의 쓰레드가 모두 완료되었을 때를 allOf로 가져와 한 곳에서 모아 결과를 확인 한 후 다시 routineRepository에 저장하도록 하였다.


위의 4개의 접근은 한번에 실행하기 때문에 사실상 저 코드는 2개의 데이터베이스 접근의 시간과 비슷하게 튜닝이 되었을 것이다.


얼마나 속도가 좋아졌는지 궁금하여 로그로 시간을 찍어보았다.


아래 사진은 기존 코드의 실행시간이다.


아래 사진은 튜닝한 코드의 실행 시간이다.


데이터베이스의 접근 4개를 동시에 처리해서 그런지, 2배 이상의 성능 향상이 일어난 것을 볼 수 있다.


최근에 리액티브 프로그래밍에 재미를 느껴 따라해보았는데, 비동기가 왜 필요한지를 다시 한 번 느낄 수 있었던 것 같다.

'크무톡톡 프로젝트' 카테고리의 다른 글

네이버 Oauth 로그인, SpringBoot  (2) 2024.07.23
Nginx로 Swagger Proxy_pass  (1) 2024.07.22
Springboot와 DialogFlow 연동 - API  (0) 2024.01.17
SMTP 서버 구축  (0) 2024.01.04
EC2에 Java 17 설치  (1) 2023.12.29
반응형

이번 프로젝트에서 가장 중요했던 부분이다.

해당 질문에 대하여 학습된 답변을 가져와야 하는 데, 이 부분은 처음하는 거라 스케줄을 많이 빼고 충분히 볼 수 있도록 계획했었다.


일단 당연히 GCP의 dialogFlow가 필요하다.

기본적으로 질문: 안녕 -> 답변: 안녕하세요! 가 나오기 때문에 해당 답변을 얻어낼 수 있도록 해보자.


우선 설정에서 나오는 Project ID를 가져와야 한다.


해당 ID를 복사해서 application.yml에 넣어두자.

나중에 value로 사용해야 한다.


그러고 그 아이디를 클릭하면 GCP 콘솔로 넘어가게 된다.

여기서


라이브러리에 들어가서 

여기의 Dialogflow API에 들어간 후 사용할 수 있도록 설정을 해준다.

사실 굳이 안해도 이미 설정이 되어 있긴 하더라...


그리고 권한 설정을 위해

여기로 들어간다.


그러면 이렇게 계정들이 나올거다.

그러면 사용할 계정의 역할에 Dialogflow API 관리자를 추가해준다.


서비스 계정으로 넘어와서

나와있는 이메일을 클릭한 후

키를 생성해준다.


해당 키는 json 파일로 생성이 될 거고, 해당 키는 스프링부트에서 사용해야 하기 때문에 잘 저장해두도록 한다.


스프링부트로 넘어오자.

일단 다운받은 키를 설정해주어야 하는 데, 환경변수로

GOOGLE_APPLICATION_CREDENTIALS={키의 주소(.json 포함해서)}


키의 주소를 설정해주고 간다.


그리고 build.gradle에 해당 의존성을 추가 해준 후

implementation 'com.google.cloud:google-cloud-dialogflow:4.18.0'


private static int sessionId = 0;

    @Value("${dialogFlow.projectId}")
    private String projectId;

    @Override
    public ResponseEntity<String> getChat(String question) {
        try(SessionsClient sessionsClient = SessionsClient.create()){

            SessionName sessionName = SessionName.of(projectId, String.valueOf(sessionId++));

            TextInput.Builder textInput =
                    TextInput.newBuilder().setText(question).setLanguageCode("ko");

            QueryInput queryInput = QueryInput.newBuilder().setText(textInput).build();

            DetectIntentResponse response = sessionsClient.detectIntent(sessionName, queryInput);

            return new ResponseEntity<>(response.getQueryResult().getFulfillmentText(), HttpStatus.OK);

        } catch (IOException e) {
            throw new RuntimeException(e);
        }
    }


나는 응답코드를 이렇게 작성했다.


요청받은 질문에 따라, 세션을 만들고 요청하는 방식이다.

이미 인증키가 있기 때문에 인증에도 문제가 생기지 않는다.

response.getQueryResult().getFulfillmentText()로 응답 중에서 답변을 가져올 수 있다.


간단하게 만든 API를 테스트 해보자면

이렇게 안녕을 입력했을 때 정상적인 답변이 나오게 된다.

하지만 좀 치명적인 문제가 많이 느리다는 것이다.


DetectIntentResponse response = sessionsClient.detectIntent(sessionName, queryInput);


세션의 아이디가 계속 바뀌기 때문에 다른 세션에서 동작을 하는 것으로 확인했고, 1개를 요청하던 2개를 요청하던 똑같은 시간으로 그냥 오래 걸린다.


당분간은 시간 줄일 수 있도록 해보고, 너무 느리다면 웹훅으로도 해보도록 해야겠다.


'크무톡톡 프로젝트' 카테고리의 다른 글

Nginx로 Swagger Proxy_pass  (1) 2024.07.22
CompletableFuture 적용으로 성능 튜닝  (0) 2024.03.09
SMTP 서버 구축  (0) 2024.01.04
EC2에 Java 17 설치  (1) 2023.12.29
EC2 memory swap  (0) 2023.12.29
반응형

최근에 서비스를 만들다보면 메일 서비스를 만들어야 하는 경우가 있었다.

앞으로도 쭉 사용을 할 거 같고 구글 메일에서 설정하는 부분을 자주 까먹어서 이번에 기록해두려고 한다.


  • 구글 이메일 설정

일단 서버를 구축하기 전에 구글 계정을 설정해주어야 한다.


구글의 계정설정 -> 보안


여기서 2단계 인증을 한 후 앱 비밀번호를 만들어준다.


나중에 스프링부트에서 사용해야 하기 때문에 이 때 만들어진 앱 비밀번호는 어디에다가 기록해두도록 한다.


그리고 Gmail 설정 -> 전달 및 POP/IMAP에서

IMAP 사용으로 변경 후 저장해준다.


  • SpringBoot 설정

이제 스프링부트에서 메일을 보낼 수 있는 서비스를 만들어보자.


일단 application.yml에 계정에 대한 정보를 입력한다.


spring.mail.host -> 서버 호스트

spring.mail.port -> 서버 포트 번호

spring.mail.username -> 서버 아이디

spring.mail.password -> 발급받은 앱 비밀번호 12자리


아래는 starttls 설정으로 안하면 관련된 에러가 발생할 것이다.


이제 전송하는 코드를 작성해보자.

일단 테스트 용으로 간단하게 API로 이메일을 받고 테스트 내용을 보내는 코드를 작성해 볼 것이다.


보낼 때는 javaMailSender를 이용한다.


@RestController
@RequiredArgsConstructor
class EmailController(
    val javaMailSender: JavaMailSender) {


    @GetMapping("/api/mail")
    fun send(email: String){
        val mimeMessage = javaMailSender.createMimeMessage()
        val helper = MimeMessageHelper(mimeMessage, true, "UTF-8")
        helper.setTo(email)
        helper.setSubject("테스트 용입니다.")
        helper.setText("테스트 드래곤입니다.")
        javaMailSender.send(mimeMessage)
    }
}


이렇게 작성을 끝내고 이제 Swagger로 테스트를 해보자.


이렇게 전송을 하면


잘 오는 것을 확인할 수 있다.

'크무톡톡 프로젝트' 카테고리의 다른 글

Nginx로 Swagger Proxy_pass  (1) 2024.07.22
CompletableFuture 적용으로 성능 튜닝  (0) 2024.03.09
Springboot와 DialogFlow 연동 - API  (0) 2024.01.17
EC2에 Java 17 설치  (1) 2023.12.29
EC2 memory swap  (0) 2023.12.29
반응형

해당 내용은 다른 블로그에도 많이 작성이 되어 있지만, 그거 찾아보기도 귀찮아서 이번에 정리해보려고 한다.


환경은 Unbuntu이다.


우선 apt를 update 해준다.

sudo apt update


그러면 무언가 쭈루루룩 업데이트가 될 것이다.


그럼 이 중에서 자바 17을 설치해주자.

sudo apt install openjdk-17-jdk


일단 이렇게만 하면 자바가 설치가 된다.


하지만 여기서 끝나는 것이 아니라 환경변수도 설정을 해주어야 한다.


일단 현재는 설정이 되어있지 않다.


자바의 경로를 찾아보자

which java


그러면 보통 아래의 경로로 나올 것이다.

which java
/usr/bin/java


그러면 아래의 명령어를 입력하고

readlink -f /usr/bin/java

나오는 경로를 복사한다.


복사한 경로를 아래에서 사용한다.

vi /etc/profile

vi 편집기를 열고 가장 아래 부분에 해당 코드를 추가해준다.


export JAVA_HOME={복사한 경로(뒤에 bin 그거 빼고)}
export PATH=$JAVA_HOME/bin:$PATH


나는 아래와 같이 작성했다.

export JAVA_HOME=/usr/lib/jvm/java-17-openjdk-amd64/
export PATH=$JAVA_HOME/bin:$PATH


작성을 완료하면 아래의 명령어로 적용을 시켜준다.

source /etc/profile


완료가 되었다.

명령어로 적용이 되었는 지 확인하자.

'크무톡톡 프로젝트' 카테고리의 다른 글

Nginx로 Swagger Proxy_pass  (1) 2024.07.22
CompletableFuture 적용으로 성능 튜닝  (0) 2024.03.09
Springboot와 DialogFlow 연동 - API  (0) 2024.01.17
SMTP 서버 구축  (0) 2024.01.04
EC2 memory swap  (0) 2023.12.29
반응형

저번에 진행했던 프로젝트에서 스프링 부트 빌드 중간에 멈추는 버그가 있었다.

찾아보니 메모리의 용량부족으로 중간에 멈추는 것이라고 해서 Swap Memory를 늘리고 빌드를 하는 방법으로 해결했었다.

그렇기에 이번에도 혹시 몰라서 Swap memory를 설정하고 작업을 하려 한다.

우선 free -h 명령어로 현재 메모리를 확인해보자

free -h

그럼 이렇게 1GB 정도의 메모리만 보이게 될 것이다.

여기에 추가로 Swap Memory를 설정해주어야 한다.


1. Swap 파일 메모리를 할당

sudo dd if=/dev/zero of=/swapfile bs=128M count=16


2. swapfile에 접근권한 설정

sudo chmod 600 /swapfile


3. swap 공간 생성

sudo mkswap /swapfile


4. swapfile을 swap memory에 추가

sudo swapon /swapfile


5. 부팅시 swap memory 설정

sudo vi /etc/fstab

# 마지막에 해당 코드 추가
/swapfile swap swap defaults 0 0


확인을 해보면


이렇게 잘 설정이 된 것을 볼 수 있다.

'크무톡톡 프로젝트' 카테고리의 다른 글

Nginx로 Swagger Proxy_pass  (1) 2024.07.22
CompletableFuture 적용으로 성능 튜닝  (0) 2024.03.09
Springboot와 DialogFlow 연동 - API  (0) 2024.01.17
SMTP 서버 구축  (0) 2024.01.04
EC2에 Java 17 설치  (1) 2023.12.29
반응형

저번 글에 Redis를 사용해 조회수를 구현했었다.

하지만 저번 로직은 가장 큰 문제가 있다.

해당 API를 계속 누르면 카운트가 계속 올라간다, 이렇게 만들면 한 유저가 그냥 페이지를 계속 새로고침 하면 조회수가 계속 올라가게 된다.


그렇기에 이것을 막기 위해 유저마다 조회수 올라가는 것에 대기 시간을 주기로 했다.


처음에는 HttpServletRequest에서 유저들의 IP를 받아오고 해당 IP들을 redis에 저장을 한 뒤 해당 IP가 존재하면 카운트를 하지 않는 방법을 생각했었다.


하지만 추천하지 않는 방법이라고 한다.

우선 사용자의 IP가 변할 수 있다. IP는 유동적으로 변할텐데, 만약 바뀐다면 같은 유저라도 카운트가 될 수 있기 때문이다.

그리고 Redis에 용량에 부담이 가게 되며, 유저들의 IP를 가지고 있는 것 또한 보안에 문제가 될 수 있다고 한다.


그래서 생각한 방법이 처음 접속을 하면 해당 유저에게 쿠키를 넣어주고 만약 쿠키를 체크했을 때 쿠키가 있다면 조회수를 증가시키지 않는 방법이다.


    public ResponseEntity<AllHitRes> hit(
            @ApiIgnore @CookieValue(value = "hitCookie", defaultValue = "0") Integer hitCookie,
            HttpServletResponse httpServletResponse){
        return allService.getHit(hitCookie, httpServletResponse);
    }

이렇게 Controller에서 쿠키를 가져온다.


    private final RedisTemplate<String, String> redisTemplate;

    @Transactional
    public ResponseEntity<AllHitRes> getHit(Integer hitCookie, HttpServletResponse httpServletResponse){


        if(hitCookie == 0) IncrementTodayAndSetCookie(httpServletResponse);

        Long today = Long.parseLong(Objects.requireNonNull(redisTemplate.opsForValue().get("today")));
        Long total = Long.parseLong(Objects.requireNonNull(redisTemplate.opsForValue().get("total")));

        return new ResponseEntity<>(new AllHitRes(today, today + total), HttpStatus.OK);
    }

    private void IncrementTodayAndSetCookie(HttpServletResponse httpServletResponse){
        redisTemplate.opsForValue().increment("today");

        Cookie cookie = new Cookie("hitCookie", "1");
        cookie.setMaxAge(900);
        httpServletResponse.addCookie(cookie);
    }

Service에서 체크를 하고 만약 hitCookie가 default 값인 0이라면 15분 유효의 쿠키를 넣어주고 today의 값을 1 증가시켜 준다.


이렇게 구현을 하니 쿠키를 직접 지우지 않는 이상 중복된 접속은 조회수가 증가를 하지 않게 되었다.

'블로그 개발 프로젝트' 카테고리의 다른 글

Redis를 사용한 조회수 구현  (0) 2023.08.10
Redis ERR value is not an integer or out of range  (0) 2023.08.09
Nginx에 페이지 연결하기  (0) 2023.08.07
EC2에 Nginx 초기 설정  (0) 2023.08.05
ExceptionHandler  (0) 2023.07.28
반응형

저번 글에서 작성한 것처럼 SpringBoot와 Redis를 연결하고 조회수 기능을 구현할 것이다.


저번에 RedisTemplate까지 작성을 했었다.


우선 계획은 오늘의 조회수와 총조회수를 반환하는 API를 만들고 해당 API를 호출할 때마다 오늘의 조회수가 +1 될 수 있도록 만들 것이다.


우선 조회수가 반환될 수 있는 Dto를 작성해준다.

@Data
@AllArgsConstructor
public class AllHitRes {

    @ApiModelProperty(
            value = "블로그 오늘 조회수",
            example = "1"
    )
    private Long today;

    @ApiModelProperty(
            value = "블로그 전체 조회수",
            example = "1020303"
    )
    private Long total;
}


그러고는 Redis에서 데이터를 가져오고 오늘의 조회수를 +1 해주는 Service를 구현해 보자.

    private final RedisTemplate<String, String> redisTemplate;

    @Transactional
    public ResponseEntity<AllHitRes> getHit(Integer hitCookie, HttpServletResponse httpServletResponse){
		
        redisTemplate.opsForValue().increment("today");

        Long today = Long.parseLong(Objects.requireNonNull(redisTemplate.opsForValue().get("today")));
        Long total = Long.parseLong(Objects.requireNonNull(redisTemplate.opsForValue().get("total")));
	
        return new ResponseEntity<>(new AllHitRes(today, today + total), HttpStatus.OK);
    }


increment를 이용하여 today를 +1 하고 그 today와 total을 가져온다.

값을 클라이언트로 보낼 때는 today와 today + total(금일의 조회수까지 합치기 위함)로 보낸다.


이제 하루에 한 번 redis에 모아둔 값을 DB로 보내야 한다.

이 방법은 자바의 스케줄러를 사용한다.

@Component
@AllArgsConstructor
@Slf4j
public class RedisToDbScheduler {

    private RedisTemplate<String, String> redisTemplate;
    private HitRepository hitRepository;

    @Scheduled(cron = "0 0 0 * * *")
    @Transactional
    public void saveHitToDB(){

        Long today = Long.parseLong(Objects.requireNonNull(redisTemplate.opsForValue().get("today")));
        Long total = Long.parseLong(Objects.requireNonNull(redisTemplate.opsForValue().get("total")));

        HitEntity hitEntity = new HitEntity(today, total);

        redisTemplate.opsForValue().set("total", String.valueOf(today + total));
        redisTemplate.opsForValue().set("today", String.valueOf(0));

        log.info("today: {}. total: {}", today, today + total);

        hitRepository.save(hitEntity);
    }
}

@Component를 달아주고 스케줄러로 사용할 메서드에 @Scheduled로 시간을 명시해 준다.

당연하게 @Component를 달아주어야 Spring에게 관리될 수 있다.


@Scheduled에는 cron을 사용하여 서버시간으로 0시 0분 0초에 해당 메서드가 실행될 수 있도록 만들었다.

저 메서드에서는 금일의 조회수와 총조회수를 가져와서 DB에 기록해 두고 기록해 두고

금일 조회수와 총조회수를 합쳐 총 조회수를 갱신을 한 후 금일 조회수를 다시 0으로 만들어준다.


이렇게 하면 하루에 한 번 메서드가 실행이 되어 redis와 db를 관리할 수 있다.

'블로그 개발 프로젝트' 카테고리의 다른 글

조회수 중복 유저 제거  (0) 2023.08.10
Redis ERR value is not an integer or out of range  (0) 2023.08.09
Nginx에 페이지 연결하기  (0) 2023.08.07
EC2에 Nginx 초기 설정  (0) 2023.08.05
ExceptionHandler  (0) 2023.07.28
반응형

블로그의 조회수를 저장하고 가져올 수 있도록 해야 할 거 같아서 해당 기능을 Redis로 사용해보려 했다.


당연히 redis를 build.gradle에 추가하고

implementation 'org.springframework.boot:spring-boot-starter-data-redis'


RedisConfig를 작성해줬다.

package cobo.blog.global.Config;

import org.springframework.beans.factory.annotation.Value;
import org.springframework.context.annotation.Bean;
import org.springframework.context.annotation.Configuration;
import org.springframework.data.redis.connection.RedisConnectionFactory;
import org.springframework.data.redis.connection.lettuce.LettuceConnectionFactory;
import org.springframework.data.redis.core.RedisTemplate;
import org.springframework.data.redis.repository.configuration.EnableRedisRepositories;
import org.springframework.data.redis.serializer.StringRedisSerializer;

@Configuration
@EnableRedisRepositories
public class RedisConfig {

    @Value("${spring.redis.host}")
    private String host;

    @Value("${spring.redis.port}")
    private int port;

    @Bean
    public RedisConnectionFactory redisConnectionFactory(){
        return new LettuceConnectionFactory(host, port);
    }

    @Bean
    public RedisTemplate<?, ?> redisTemplate() {
        RedisTemplate<byte[], byte[]> redisTemplate = new RedisTemplate<>();
        redisTemplate.setConnectionFactory(redisConnectionFactory());
        return redisTemplate;
    }
}

여기까지야 뭐... 그냥 다른 블로그들 찾아가며 작성했다.


당연히 괜찮을 줄 알았다....


이렇게 template을 작성하고

    public void RedisTest(){
        ValueOperations<String, Integer> stringIntegerValueOperations = redisTemplate.opsForValue();

        if(stringIntegerValueOperations.get("count") == null)
            stringIntegerValueOperations.set("count", 1);

        Long incrementedValue = stringIntegerValueOperations.increment("count");
        log.info("after increment: " + incrementedValue);
    }

이 코드를 실행해보았다.


하지만 이런 에러가 발생

난 분명히 1을 넣었는데, 증가할 수 없는 값이라고 한다.


redis로 바로 가서 확인해보았다.

내가 넣은 값이 이렇게 변환되어 저장이 되었고, 그렇기에 증가할 수 없었던 것이다.


이 부분을 바꾸고 싶다면 RedisTemplate을 다시 작성해야 한다.

    @Bean
    public RedisTemplate<String, Object> redisTemplate() {
        RedisTemplate<String, Object> redisTemplate = new RedisTemplate<>();
        redisTemplate.setKeySerializer(new StringRedisSerializer());
        redisTemplate.setValueSerializer(new StringRedisSerializer());
        redisTemplate.setConnectionFactory(redisConnectionFactory());
        return redisTemplate;
    }

저장 하는 중에 Serialize하는 방법을 바꾸어 주면 해결이 된다.


    public void RedisTest(){
        ValueOperations<String, String> stringIntegerValueOperations = redisTemplate.opsForValue();

        if(stringIntegerValueOperations.get("count") == null)
            stringIntegerValueOperations.set("count", "1");

        Long incrementedValue = stringIntegerValueOperations.increment("count");
        log.info("after increment: " + incrementedValue);
    }

이렇게 코드르 수정하고 실행해보면 

잘 작동하는 것을 볼 수 있다.

'블로그 개발 프로젝트' 카테고리의 다른 글

조회수 중복 유저 제거  (0) 2023.08.10
Redis를 사용한 조회수 구현  (0) 2023.08.10
Nginx에 페이지 연결하기  (0) 2023.08.07
EC2에 Nginx 초기 설정  (0) 2023.08.05
ExceptionHandler  (0) 2023.07.28

+ Recent posts